I strongly suggest every web developer should own a domain, that helps you to understand the real time web system. The web giant Google offering a free tool called Google Apps Standard Edition you will get Gmail, GTalk, GCal, and Gdocs. This post explains how to setup the free Google Apps Standard for your domain.


Revisions
- September 2, 2015 @ 14:26:05 [Current Revision] by PeterLugg
- September 2, 2015 @ 14:26:05 by PeterLugg
- October 18, 2012 @ 05:44:27 by PeterLugg
Revision Differences
| October 18, 2012 @ 05:44:27 | Current Revision | ||
|---|---|---|---|
| Content | |||
| Added: <div>I strongly suggest every web developer should own a domain, that helps you to understand the real time web system. The web giant Google offering a free tool called <a href="https:/ /www.google.com/a/cpanel/ standard/new3">Google Apps Standard Edition</a> you will get Gmail, GTalk, GCal, and Gdocs. This post explains how to setup the free Google Apps Standard for your domain.</div> | |||
| Deleted: | Added: | ||
| Added: <div><img src="https:// lh5.googleusercontent.com/ -uaNMogFULa8/ T_AdPFCQ-UI/ AAAAAAAAGK8/FLsYJrC6Nc4/ s550/banner.png" alt="Google Apps Standard for Free." /></div> | |||
| Added: <a name="more"></a> | |||
| Added: <a href="http:// mail.egglabs.in/" target="_blank"><img src="http://wiki.pixelpress.com.au/ files/2012/10/live.png" alt="" align="absmiddle" border="0" />Live Demo</a> | |||
| Added: <strong>Step 1</strong> | |||
| Added: Go to <a href="https:/ /www.google.com/a/cpanel/ standard/new3">Google App Standard</a> here you have to add the domain. | |||
| Added: <div><img src="https:// lh5.googleusercontent.com/ -FurEK0Akf0c/ T_B0yjMWSaI/ AAAAAAAAGLQ/0piF- gnS37Q/s550/s1.png" alt="Google Apps Standard for Free." /></div> | |||
| Added: <strong>Step 2</strong> | |||
| Added: Choose custom setup click <em>Go Custom</em> button. | |||
| Added: <div><img src="https:// lh4.googleusercontent.com/ -X2-Azw9q0CE/ T_B0y7-kmeI/ AAAAAAAAGLU/H6ADFlRhXEM/ s550/s2.png" alt="Google Apps Standard for Free." /></div> | |||
| Added: <strong>Step 3</strong> | |||
| Added: Now the domain owner verification. | |||
| Added: <div><img src="https:// lh4.googleusercontent.com/ -AGeqV6LxkeU/ T_B0zciWrNI/ AAAAAAAAGLY/Hhs3JU8Bxjo/ s550/s3.png" alt="Google Apps Standard for Free." /></div> | |||
| Added: <strong>Step 4</strong> | |||
| Added: You can verify the domain uploading a HTML file with specified files name. | |||
| Added: <div><img src="https:// lh5.googleusercontent.com/ -u_eSpg5GuV0/ T_B01CZEL3I/ AAAAAAAAGLs/nhTRLcs9tU4/ s550/s4.png" alt="Google Apps Standard for Free." /></div> | |||
| Added: <strong>Step 5</strong> | |||
| Added: Other way of verification you can include this META tag in domain index page. | |||
| Added: <div><img src="https:// lh3.googleusercontent.com/ -zJjuPAPlUVI/ T_B00uZAQpI/ AAAAAAAAGLw/xCQ6kTDBCf4/ s550/s5.png" alt="Google Apps Standard for Free." /></div> | |||
| Added: <strong>Step 6</strong> | |||
| Added: After domain verification the following success message will apear. | |||
| Added: <div><img src="https:// lh4.googleusercontent.com/ -Yh4RENQ6IjQ/ T_B00laxM_I/ AAAAAAAAGLo/FGQDD5UHnpY/ s550/s6.png" alt="Google Apps Standard for Free." /></div> | |||
| Added: <strong>Step 7</strong> | |||
| Added: Now creating team emails. | |||
| Added: <div><img src="https:// lh6.googleusercontent.com/ -jeHyGUtYvug/ T_B02E7VsrI/ AAAAAAAAGL4/LUdtnJZN7Q4/ s550/s7.png" alt="Google Apps Standard for Free." /></div> | |||
| Added: <strong>Step 8</strong> | |||
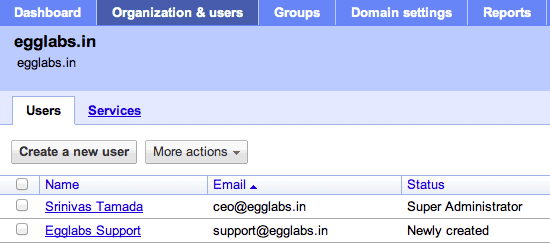
| Added: Go to <em>Organization & users</em> click <em>Create a new user</em> button and you can create team user email. | |||
| Added: <div><img src="https:// lh3.googleusercontent.com/ -bi_LYh6gkeg/ T_B02cdtn4I/ AAAAAAAAGME/_ f3Q3BiOzyA/s322/s8.png" alt="Google Apps Standard for Free." /></div> | |||
| Added: <strong>Step 9</strong> | |||
| Added: It will success message popup. | |||
| Added: <div><img src="https:// lh3.googleusercontent.com/ -FHuyJZ6Nqb8/ T_B021ij_ZI/ AAAAAAAAGMA/UO2tWEncN0o/ s366/s9.png" alt="Google Apps Standard for Free." /></div> | |||
| Added: <strong>Step 10</strong> | |||
| Added: In Organization & users tab contains all the team emails list. | |||
| Added: <div><img src="https:// lh6.googleusercontent.com/ -V0YGDPqQ3aE/ T_CLgA95xLI/ AAAAAAAAGMs/cYVl_ OxWQ2g/s550/s91.png" alt="Google Apps Standard for Free." /></div> | |||
| Added: <strong>Step 11</strong> | |||
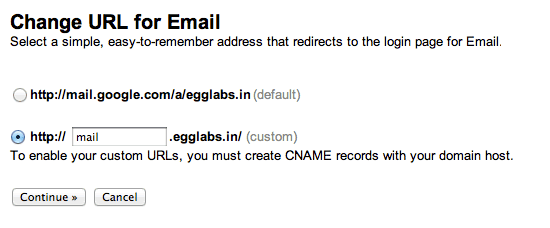
| Added: By default Google App provide you mail access URL<em>http:/ /mail.google.com/ a/yourdomain.com</em> click change URL link and setup custom URL like <em>http: //mail.yourdomain.com</em> | |||
| Added: <div><img src="https:// lh5.googleusercontent.com/ -Rmy0lCO8AE0/ T_CLgAWkpoI/ AAAAAAAAGM0/jQ_ V3qf_2Jg/s550/s92.png" alt="Google Apps Standard for Free." /></div> | |||
| Added: <strong>Step 12</strong> | |||
| Added: You can choose your custom URL here. | |||
| Added: <div><img src="https:// lh3.googleusercontent.com/ -Ouehc1EIy4w/ T_CLgP42KbI/ AAAAAAAAGMw/WKCcyGNcqlg/ s550/s93.png" alt="Google Apps Standard for Free." /></div> | |||
| Added: <strong>Step 13</strong> | |||
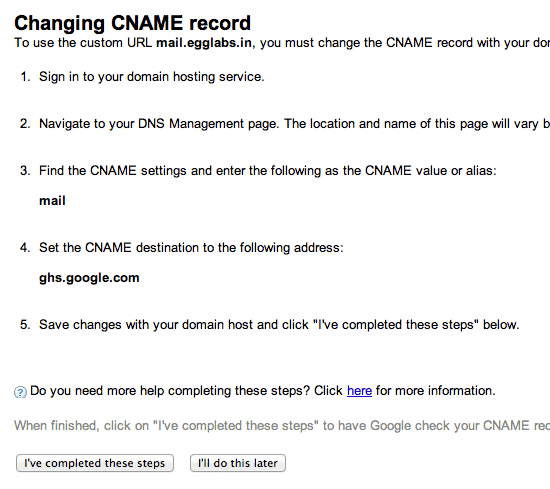
| Added: Now you have to modify the domain CNAME record | |||
| Added: <div><img src="https:// lh3.googleusercontent.com/ -aCjueXGbfSU/ T_CLhWh5s8I/ AAAAAAAAGNA/mkIapJJFj7w/ s550/s94.png" alt="Google Apps Standard for Free." /></div> | |||
| Added: <strong>Step 14</strong> | |||
| Added: Open a new tab login into you domain provier site like Godaddy, Bigrock etc, Go to the domain DNS settings and add <em>mail</em> CNAME points to Google server<em>ghs.google.com</em> | |||
| Added: <div><img src="https:// lh3.googleusercontent.com/ -qekhmk7g9CM/ T_CQCi8cElI/ AAAAAAAAGNg/Bu0Noszt2QI/ s550/cname.png" alt="Google Apps Standard for Free." /></div> | |||
| Added: <strong>Step 15</strong> | |||
| Added: You have add MX records in following way and save the DNS settings. | |||
| Added: <div><img src="https:// lh5.googleusercontent.com/ -N38D7s1eGVk/ T_CQFyqlyeI/ AAAAAAAAGNo/TDlaVCBOnk4/s550/ mxrecords.png" alt="Google Apps Standard for Free." /></div> | |||
| Added: <strong>Step 16</strong> | |||
| Added: Now back to Google App page go to <em>Domain settings</em> tab click <em>Appearance</em>upload your logo | |||
| Added: <div><img src="https:// lh5.googleusercontent.com/ -or7J0RnGKUo/ T_CLjuKyPSI/ AAAAAAAAGNM/90gBXaTpblQ/ s550/s96.png" alt="Google Apps Standard for Free." /></div> | |||
| Added: <strong>Step 17</strong> | |||
| Added: Now the email application ready. | |||
| Added: <div><img src="https:// lh4.googleusercontent.com/ -BmoNshnbTEg/ T_CRIXmWsyI/ AAAAAAAAGN8/_ jeRJom99x8/s550/mail.png" alt="Google Apps Standard for Free." /></div> | |||
Note: Spaces may be added to comparison text to allow better line wrapping.
No comments yet.